


Last Updated: November 5, 2026
Quick Summary
To set up a bivy sack in high wind, orient it with your head into the wind and the entry facing leeward, then stake the windward corners first before the leeward ones. Set at least four anchor points, more if gusts are forecast, and match your anchors to the ground type.
- Watch the wind for five minutes before unpacking to find windward and leeward sides.
- Drive stakes at roughly 45 degrees pointing away from the shelter.
- In sand, bury a stuff sack, rock, or horizontal stake as a deadman anchor.
- Retension guy lines after the first big gust settles the fabric.
- Treat two or more observed failure signals at once as a threshold event.
Table of Contents
- Why a Bivy Sack in Wind Demands a Different Setup
- Pick a Sheltered Campsite and Read the Wind First
- How to Secure a Shelter in High Winds: Anchors, Stakes, and Guy Lines
- Step-by-Step: Orienting and Pitching Your Bivy Tent
- Build Your Bivy Sleep System for Wind and Moisture
- Wind Thresholds: When to Abandon the Bivy Plan
- Contingency Actions If the Wind Turns
- Gear Up for Your Next Windy Night Out
- Frequently Asked Questions
Why a Bivy Sack in Wind Demands a Different Setup
A bivy sack is a low-profile, single-person shelter that wraps your sleeping bag in a waterproof, breathable shell. Wind changes everything about how you pitch one.
Most bivy guides assume calm weather. That is the mistake. A loose bivy in a gust flaps like a sail, drives condensation into your bag, and can collapse on your face at 2 a.m.
Below, we walk through seven steps, from reading the ground to knowing when to walk away. Each one builds on the last.
Pick a Sheltered Campsite and Read the Wind First
Site selection decides more than any piece of gear. A good bivy site blocks the prevailing wind, drains well, and keeps you off exposed ridgelines.
Start by watching the wind for five minutes before you unpack. Note the direction it hits your face and the direction the grass bends. That tells you where windward (wind-facing) and leeward (sheltered) sit.
The National Weather Service wind forecast guidance is worth checking before you leave the trailhead. Gusts matter more than average speed.
Look for natural windbreaks:
- A dense tree line on the windward side
- A rock wall, berm, or cut bank
- A dip or hollow that sits below the surrounding ground
- The lee side of a ridge, never the crest
Avoid the obvious traps: lone trees, exposed saddles, dry creek beds, and open meadows. Each funnels wind or collects water.
Hazard checks before you commit
- Scan overhead for dead branches and widow-makers
- Confirm no flash-flood channel runs through the site
- Check for ant mounds, cactus, and sharp rocks under the footprint
- Note your escape route if conditions worsen
- Verify the ground holds stakes, or plan for rock anchors
A common mistake is pitching in the prettiest spot instead of the most protected one. Beauty does not stop a gust.
How to Secure a Shelter in High Winds: Anchors, Stakes, and Guy Lines
Securing a shelter in high winds comes down to anchor points that hold and lines that stay tight. A bivy without a freestanding frame leans entirely on stakes, guy lines, and the ground itself. The gap most guides leave is ground-specific anchoring: the same stake technique that works in loam fails in sand, rock, or frozen turf. Here is how to anchor a frameless bivy across the ground types you will actually meet.
Stake placement and guy-line geometry
Drive stakes at a low angle, roughly 45 degrees, pointing away from the shelter. A stake pulled straight up pops out. A stake loaded sideways digs in. Set at least four anchor points, more if the forecast calls for gusts, and place them at the corners of the bivy footprint rather than along the middle of an edge.
Guy lines should run taut but not guitar-string tight. Leave a little give so gusts flex the shelter instead of ripping a stake free. Use a taut-line hitch so you can retension without re-staking.
Anchoring by ground type
Soft soil and duff: Standard stakes work if driven past the fluke.
Sand: Stakes alone will not hold.
Rocky ground: You may not be able to drive a stake at all.
Frozen or snow-covered ground: Standard stakes will not penetrate. Use snow stakes or deadman anchors buried in snow and packed firm.
Watch out: a single anchor point carrying the full wind load will fail first.
For deeper knot work and tarp configurations, our DIY poncho tarp shelter setup guide covers the essential knots and military-style pitches that pair well with a bivy.
Match your anchor to the ground you're actually pitching on, because the same stake technique fails across different surfaces.
| Ground type | Anchoring method | Key detail |
|---|---|---|
| Soft soil and duff | Standard stakes driven past the fluke | Stack a rock or loaded stuff sack on the stake head |
| Sand | Deadman anchor | Bury a stuff sack, rock, or horizontal stake and pack sand over it |
| Rocky ground | Rock anchors | Tie around a large rock or wedge one into a crack |
| Frozen or snow-covered ground | Snow stakes or buried deadman anchors | Standard stakes will not penetrate |
Step-by-Step: Orienting and Pitching Your Bivy Tent
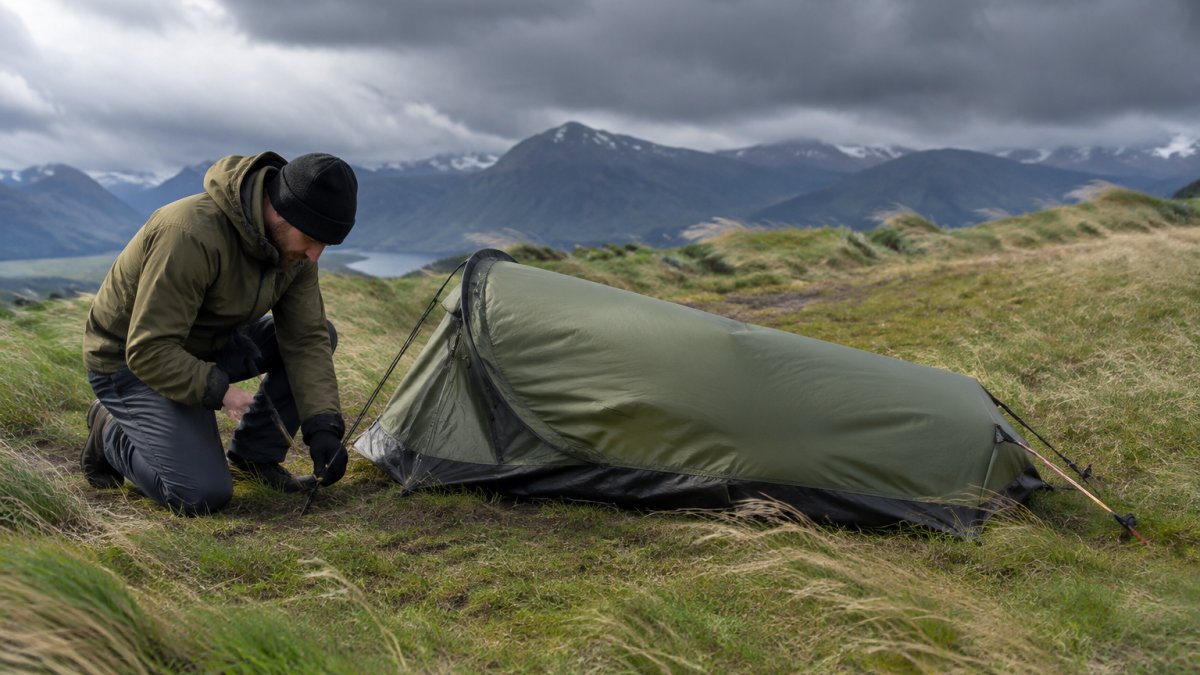
Orient the bivy so your head points into the wind and the entry faces leeward. This one decision keeps spindrift out and lets you unzip without eating a face full of grit.
Here is the full sequence:
- Clear the ground. Remove rocks, sticks, and cones from your footprint.
- Lay a groundsheet. A thin sheet protects the bivy floor and adds a moisture barrier.
- Position the bivy. Head into the wind, foot downwind, entry on the sheltered side.
- Stake the windward corners first. Load them before the shelter can flap.
- Add the head pole if your bivy has one. Seat it fully so the hood stays off your face.
- Stake the leeward corners. Keep the fabric slightly off your bag for airflow.
- Tension the guy lines. Retension after the first big gust settles the fabric.
Anchor without a freestanding frame
A frameless bivy has no poles to brace it, so the stakes are your structure. Set at least four anchor points, more if the forecast calls for gusts. If the ground will not hold a stake, switch to rock anchors or a deadman setup. Never rely on body weight alone to hold a bivy down.
If you want a shelter with more structure for rough nights, our Ridgeback one-person bivy and survival shelter uses color-coded webbing for fast setup in low light and poor weather.
Dragoon Unlimited Ridgeback One Person Camping, Hunting Tent, Bugout Bivy →

Build Your Bivy Sleep System for Wind and Moisture
Wind and moisture attack together.
Layer it like this:
- Sleeping pad for insulation from cold ground
- Sleeping bag rated for the expected low
- Bivy sack as the outer shell
- Groundsheet beneath the bivy floor
Ventilation is your friend. Crack the entry or hood just enough to move air without letting rain in.
A common mistake is over-bagging. If you sweat inside the shell, you wake up damp and cold. Dress in layers you can shed.
For extra warmth and versatility, our guide to ways to use a woobie blanket in the field shows how a poncho liner layers into a wind-ready sleep system.
Wind Thresholds: When to Abandon the Bivy Plan
There is a point where a bivy stops being the right tool. Knowing that threshold is a skill, not a weakness. Most guides tell you to watch for flapping fabric; few give you a number or a decision rule. Here is a practical framework built on forecast data and observed conditions.
Read the forecast before you commit
Check the National Weather Service wind forecast guidance before you leave the trailhead. Gusts matter more than average speed. Strong gusts are a signal to choose a more sheltered site or a different shelter.
Treat forecast uncertainty as a margin. If the forecast is calling for gusts within 5 mph of your personal limit, plan for the higher number. Forecasts can be off, so build in a buffer.
Observed signals that mean stop
Watch for these signals in the field:
- Gusts that flatten the bivy against your body and stay flattened for more than a few seconds
- Stakes pulling free faster than you can reset them
- Fabric flapping hard enough to keep you awake or to abrade seams
- Any sign of the shelter shredding or seams failing
- Wind-driven rain or grit entering the hood despite a leeward entry
When two or more of these appear at once, treat it as a threshold event. Do not wait for the shelter to fail completely.
The decision rule
Set your personal limit before the trip and honor it. If wind is strong and you cannot find a sheltered site, move to a more protected spot, add a windbreak, or retreat to a harder shelter or vehicle. A bivy is a light, fast shelter, not a storm bunker.
The thing nobody tells you about wind is that it rarely builds slowly. It arrives in bursts. Set your limit before the trip, and honor it.
Contingency Actions If the Wind Turns
If the wind shifts or strengthens after you are pitched, act in order. Speed matters more than pride.
First, retension every guy line and reset any loose stake. Second, add weight: pile rocks or packs on the windward skirt. Third, if the bivy keeps failing, break it down and rebuild in a more protected spot.
If no shelter holds, build an emergency one. Our durable survival shelter guide walks through proven designs using natural materials and a tarp. A debris hut or lean-to can block wind when gear cannot.
Pack a plan B before you leave:
- A tarp and cordage for a quick windbreak
- A backup site in mind
- A bail-out route to the trailhead
Preparedness is not pessimism. It is what lets you sleep.
Gear Up for Your Next Windy Night Out
Windy nights reward preparation and punish shortcuts. Pick the sheltered site, orient into the wind, anchor hard, and know your limits.
At Dragoon Unlimited, we build gear for friends and test it in rough country. Our Ridgeback shelters feature UV-resistant ripstop fabric, taped seams, and a bathtub-style waterproof floor to keep you dry in wind and weather.
Get started with Dragoon Unlimited and pitch a shelter that holds when the wind picks up. Sign up for our newsletter for 10% off your first order.
Frequently Asked Questions
How windy is too windy to set up a tent or bivy sack?
Sustained winds above 30 mph make pitching a bivy sack difficult and above 40 mph genuinely risky, especially on exposed ground. Gusts matter more than averages: a 25 mph forecast with 45 mph gusts can flatten a poorly anchored shelter. Check the forecast for gust values, not just sustained wind, and pick a leeward site behind terrain or brush. If gusts are pushing past what your stakes and guy lines can hold, move to lower ground or a hard shelter instead of forcing the pitch.
How do you keep a bivy sack from blowing away while you set it up?
Weight it before you unzip anything. Lay your packed bivy sack on the ground and set your loaded pack on top of it while you clear rocks and roots from the site. Once you unroll it, stake the windward corner first, then the windward head end, so the fabric cannot inflate like a sail. Keep your sleeping bag and pad inside their own bags until the shell is anchored. A bivy sack in wind is manageable if you never let it go fully loose.
Do you need a tarp with a bivy sack in high wind?
Not always, but a tarp helps in two ways. First, pitched low and angled into the wind, it blocks driven rain and cuts wind chill before it reaches the bivy fabric. Second, it gives you a dry workspace to organize your bivy sleep system. Skip the tarp only if your bivy already has a proven waterproof, breathable top and you have a natural windbreak. If you add one, pitch it as a low plow-point shelter with the point facing the wind and keep the edges staked close to the ground.
How much warmth does a bivy sack add in cold, windy conditions?
A bivy shell mainly blocks wind and splash, adding a few degrees of perceived warmth by stopping airflow over your sleeping bag. The real insulation comes from your pad and bag. In wind, pair a closed-cell or insulated inflatable pad with a bag rated below the expected low, and wear a dry base layer. Manage condensation by leaving the entry partly vented on the leeward side so moisture escapes instead of soaking your bag.


