


Table of Contents
- Essential Gear and Supplies for a Poncho Tarp Shelter
- Military Poncho Shelter Configurations for Any Terrain
- How to Pitch a Poncho Tent with Trekking Poles
- Essential Knots for Tarp Shelters That Hold Under Load
- Connecting Multiple Ponchos and Ground Tarp Options
- Weather Protection, Wind Load, and Condensation Management
- Durability, Maintenance, and Ultralight vs. Military Weight
- Frequently Asked Questions
Last Updated: September 13, 2026
Essential Gear and Supplies for a Poncho Tarp Shelter
A poncho tarp shelter is a single piece of rain gear that doubles as an emergency roof, and building one starts with choosing the right poncho, cordage, and anchors before you leave the trailhead. At Dragoon Unlimited, we've spent years field-testing gear in wet, windy conditions. Get these three categories right and everything else gets easier.
Poncho Selection: Military Surplus vs. Modern Liners
Military surplus ponchos win on durability and grommet placement, while modern liners win on weight and packability. Surplus ponchos use heavier coated nylon with reinforced grommets at the corners and midway along each side, giving you more tie-out points for a taut pitch, but they eat pack space and add weight. Modern liners are lighter and compress smaller, but many rely on snap fasteners and lighter fabric that stretches under wind load. For a bug-out bag or rough country, surplus-grade construction is the safer bet; for fast-and-light trips where the shelter is a backup, a well-made liner works fine.
Cordage, Stakes, and Trekking Poles
Cordage and stakes are where most DIY setups quietly fail. Use paracord or a dedicated guy line rated for the load, cut long enough to reach your anchors without tangling. Match stakes to the ground: sand and snow need wide, specialized stakes, while packed soil takes standard aluminum or titanium pegs. Trekking poles are the most versatile support because they adjust to any height and double as hiking gear. A common mistake is skimping on guy line length, then finding the nearest tree or rock just out of reach.
Military Poncho Shelter Configurations for Any Terrain
Military poncho shelter configurations give you a fast, adaptable roof for almost any terrain. The three workhorse setups are the lean-to, the A-frame, and the diamond fly. Knowing when to use which matters more than memorizing knots.
- Lean-to: Fastest to pitch, open on one side, best for calm nights and fair weather.
- A-frame: Fully enclosed ridge, sheds rain and wind well, needs two supports.
- Diamond fly: Single-pole pitch, excellent rain-shed, ideal for a quick bivouac.
The lean-to is the beginner's setup for mild weather. The A-frame is the all-rounder: two supports, a taut ridge line, and steep sides that shed water. The diamond fly pitches off a single high point and drops one corner low, making it a strong solo choice for maximum coverage from minimum hardware. Pick based on wind direction and time before dark.
How to Pitch a Poncho Tent with Trekking Poles
A poncho tent pitched with trekking poles is the fastest way to turn rain gear into a real shelter, and the A-frame is the configuration to master first.
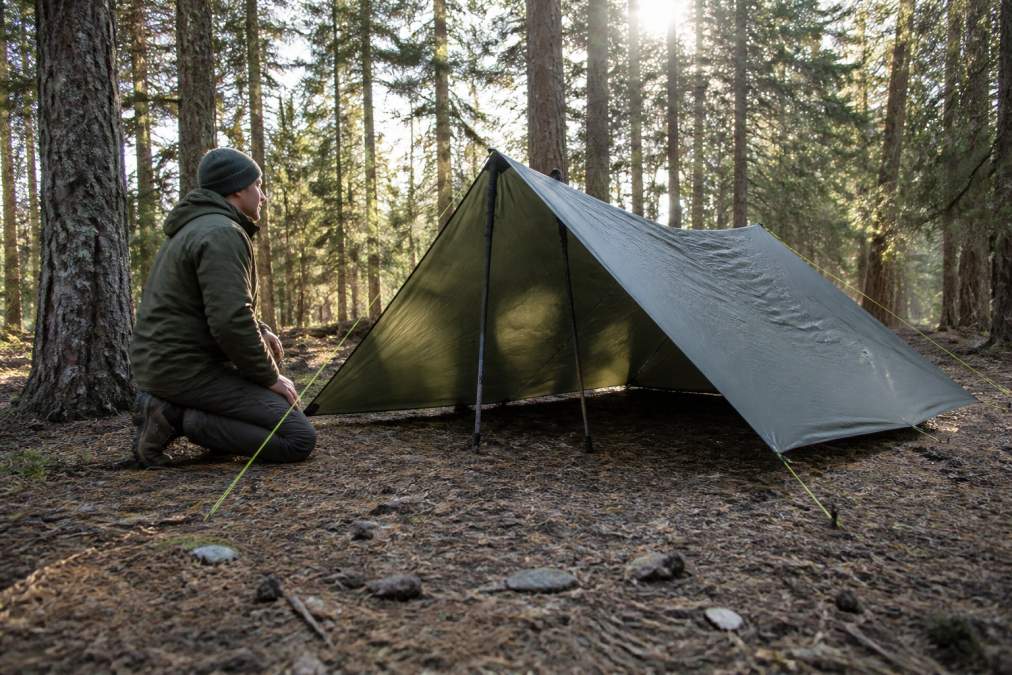
Step-by-Step A-Frame with Two Poles
- Stake the two rear corners at the head of your site, angled away from the shelter.
- Set both trekking poles to equal height, roughly 90-110 cm depending on your sitting height.
- Attach the ridgeline to each pole tip using a taut-line hitch so you can tension later.
- Stake the two front corners wide enough to create a steep, rain-shedding pitch.
- Add side guy lines at the mid-point grommets to stop the fabric from flapping.
- Re-tension everything once the shelter is up, since fabric stretches as it settles.
Expected Result: A taut, steep-sided A-frame that sheds rain and blocks wind from the rear.
Single-Pole Bivy Configuration
For a solo bivouac, pitch the diamond fly off one trekking pole set high at the head end and stake the opposite corner low. This low-profile shelter handles wind better than a tall A-frame. Crawl in feet-first, and keep your pack at the low corner to block drafts.
Essential Knots for Tarp Shelters That Hold Under Load
The essential knots for tarp shelters are the taut-line hitch, the bowline, and the trucker's hitch, and those three cover almost every pitching job. The difference between a shelter that holds through a gust front and one that collapses comes down to matching the knot to the load path.
Taut-Line Hitch: Adjustable Tension Without Untying
The taut-line hitch is an adjustable friction knot that slides along the standing part of the line to add or release tension. Use it on guy lines where you expect fabric stretch or changing wind direction. Three wraps inside the loop and two outside is standard for paracord and most 2-3 mm guy lines; with slick Dyneema or Spectra cord, add an extra wrap or the knot will creep under load (Adjustable Grip Hitch | How to tie a Adjustable Grip Hitch using Step-by-Step Animations).
Bowline: A Fixed Loop That Will Not Slip
The bowline creates a fixed loop at the end of a line that will not tighten or slip under load, ideal for anchor points around trees, rocks, or stake heads. It is easy to tie one-handed and easy to untie after heavy loading, which matters when your hands are cold and wet. Pair it with a stopper knot in the tail for security.
Trucker's Hitch: Mechanical Advantage for a Genuinely Tight Ridgeline
The trucker's hitch gives you a 2:1 or 3:1 mechanical advantage, letting you pull a ridgeline genuinely tight by hand (Trucker's Hitch | How to tie a Trucker's Hitch using Step-by-Step Animations). It uses a loop (often a slippery half hitch or a bowline) as a pulley point, then feeds the working end through and back to a final anchor. On a poncho tarp, a tight ridgeline keeps the fabric from flapping and prevents grommets from tearing in wind. A trucker's hitch on the ridgeline and taut-line hitches on the corners give the best combination of tension and adjustability.
Knot Failure Modes in Wind
Knot selection matters most in wind. The taut-line hitch can creep if tied in slick cordage or with too few wraps. The bowline can shake loose if the tail is too short. The trucker's hitch can jam so hard you cannot untie it after a wet, loaded night, which is why many campers add a quick-release loop. Practice these three until you can tie them with gloves on, and inspect them after every pitch; a knot that looks fine in daylight can be half-tied in the dark.
Sign Up For Our Newsletter for 10% OFF →
Connecting Multiple Ponchos and Ground Tarp Options
Two ponchos joined at the edges create a shelter big enough for two people, and the connection method decides whether it stays dry. Most ponchos use snap fasteners along the sides, which work for a light pitch but pop under wind load. For a serious setup, you need a connection that distributes tension across the seam rather than concentrating it at the snaps.
Lacing Method for a Load-Bearing Seam
The most reliable way to join two ponchos is to overlap the edges by 4-6 inches and lace them with paracord or 2 mm guy line through the grommets. Use a continuous running stitch through alternating grommets and tension it evenly from the center outward, spreading the load across every grommet instead of the snaps. Once laced, seal the seam with a waterproof coating or seam tape: apply sealer, let it cure, then apply a second coat after the first pitch stretches the fabric.
Snap Fasteners: When They Work and When They Fail
Snap fasteners are convenient for a quick pitch in calm conditions, but they concentrate stress at a few points, and in wind the fabric between snaps billows and the snaps pop. If you must use snaps, back them up with lacing points at the corners and midpoints. Never rely on snaps alone for a shelter you will sleep in during weather.
Ground Tarp Sizing and Placement
A ground sheet protects your sleeping bag from moisture and punctures and defines the shelter's footprint. Size it slightly smaller than the roof so runoff does not pool under you, a common rule is 6-12 inches narrower on each side, so a two-poncho A-frame takes a ground sheet roughly 6 feet by 8 feet. Tyvek or a dedicated footprint works well; avoid plastic sheeting that crinkles and tears. If you use a poncho as a ground sheet, keep it separate from your sleeping system since it will get dirty and wet.
Unique Angle: Long-Term Durability of Connections
Most guides stop at setup, but connection points are where shelters fail over time: grommets loosen, snaps corrode, and lacing abrades the fabric. After every trip, inspect the connection points for wear, and re-seal seams annually. If a grommet pulls out, repair it with a grommet kit or a reinforced patch and new hole. A maintained poncho tarp lasts many seasons; an ignored one fails at the seam.
Weather Protection, Wind Load, and Condensation Management
Wind load destroys most poncho shelters, and condensation makes them miserable. A poncho tarp sheds rain and sun well but has no structure of its own, so every pitch depends on tension and anchor quality. In strong wind, lower the pitch, add side guy lines, and angle the shelter so the low edge faces the wind. In cold weather, leave a gap at the foot end for airflow rather than sealing the shelter completely, a little ventilation beats a soaked sleeping bag.
Durability, Maintenance, and Ultralight vs. Military Weight
Maintenance separates a shelter that lasts seasons from one that fails on trip two. After every outing, dry the poncho fully before packing, since stored moisture breaks down waterproof coatings and breeds mildew. Inspect grommets and seams for wear, and reapply seam sealing as needed. This is where the ultralight versus military weight debate gets real: ultralight setups save grams but demand careful handling, while heavier military-style ponchos tolerate abuse and rough ground. Choosing between these durability trade-offs remains the primary challenge for those who aim to pack light for camping while maintaining a reliable field kit.
| Factor | Ultralight Setup | Military-Style Setup |
|---|---|---|
| Weight | Lower carry weight | Heavier, more durable |
| Durability | Needs careful handling | Tolerates rough use |
| Pack size | Compresses small | Takes more space |
| Best for | Fast, fair-weather trips | Bug-out bags, harsh conditions |
For a shelter you'll bet your night on, field-tested durability is worth the extra weight. Dragoon Unlimited builds gear around that idea, and our Leave No Trace recommendations for minimizing camp impact align with pitching light and leaving the site clean.
A poncho tarp shelter only works if the gear behind it holds up when the weather turns, and that's the whole point of carrying one. At Dragoon Unlimited, we build field-tested equipment for exactly those moments, from our multi-use poncho liners with integrated head ports to our Ridgeback shelters, all backed by fast shipping and a commitment to supporting veteran organizations with every purchase. If you want gear that survives the mission, not just the backyard, sign up for our newsletter for 10% off and see what field-tested really means.
Frequently Asked Questions
What is the best poncho for building a survival shelter?
A military-style poncho with grommets along the edges and a waterproof coating works best because it gives you multiple tie-out points and sheds rain reliably. Look for one with snap fasteners so you can join two ponchos into a larger tarp. Poncho liners add insulation underneath but are not waterproof on their own, so pair a liner with a coated outer poncho for cold or wet conditions.
How do you set up a poncho shelter with trekking poles?
Set your trekking poles to matching height, usually around 42 to 48 inches. Tie a ridge line between the two pole handles using a taut-line hitch, then drape the poncho over the line and stake the corners out at 45-degree angles. Adjust tension with the hitch until the fabric is taut and the catenary cut sheds water away from the sleeping area.
Are poncho tarps effective for long-term camping?
For a few nights to a couple of weeks, a poncho tarp shelter works well if you manage condensation and re-tension guy lines after rain. For months of use, the waterproof coating wears and seam sealing needs refreshing. Rotate the setup to avoid wearing the same grommets, and inspect the fabric for pinholes. Ultralight backpacking ponchos save weight but trade durability for grams.
How do you keep a poncho shelter waterproof during heavy rain?
Pitch the ridgeline so water runs off the back, not toward your head or feet. Add a ground sheet underneath to block splash-back, and dig a shallow drainage trench around the footprint if the site allows. Reapply seam sealer to the head hole and any stitched areas before the trip. Keep guy lines tensioned so the fabric does not sag and pool water in the middle.


