


Table of Contents
- How Outdoor Apparel Enhances Comfort and Safety During Missions
- How to Layer Outdoor Clothing for Changing Conditions
- Moisture-Wicking Clothing for Outdoor Activities
- Weather-Appropriate Outdoor Apparel Selection
- Outdoor Clothing Checklist for Mission-Ready Gear
- Fit, Mobility, and Durability: Testing Your Gear Before the Mission
- Common Gear Failures and How to Prevent Them
- Frequently Asked Questions
Last Updated: October 12, 2026
How Outdoor Apparel Enhances Comfort and Safety During Missions
The difference between a successful outdoor mission and a dangerous one often comes down to outdoor apparel comfort safety, what you're wearing.
Outdoor apparel comfort safety work together: comfort keeps you focused and efficient, while safety gear protects you from environmental threats.
Your apparel must manage moisture, regulate temperature, shield you from weather, and allow full mobility.
How to Layer Outdoor Clothing for Changing Conditions
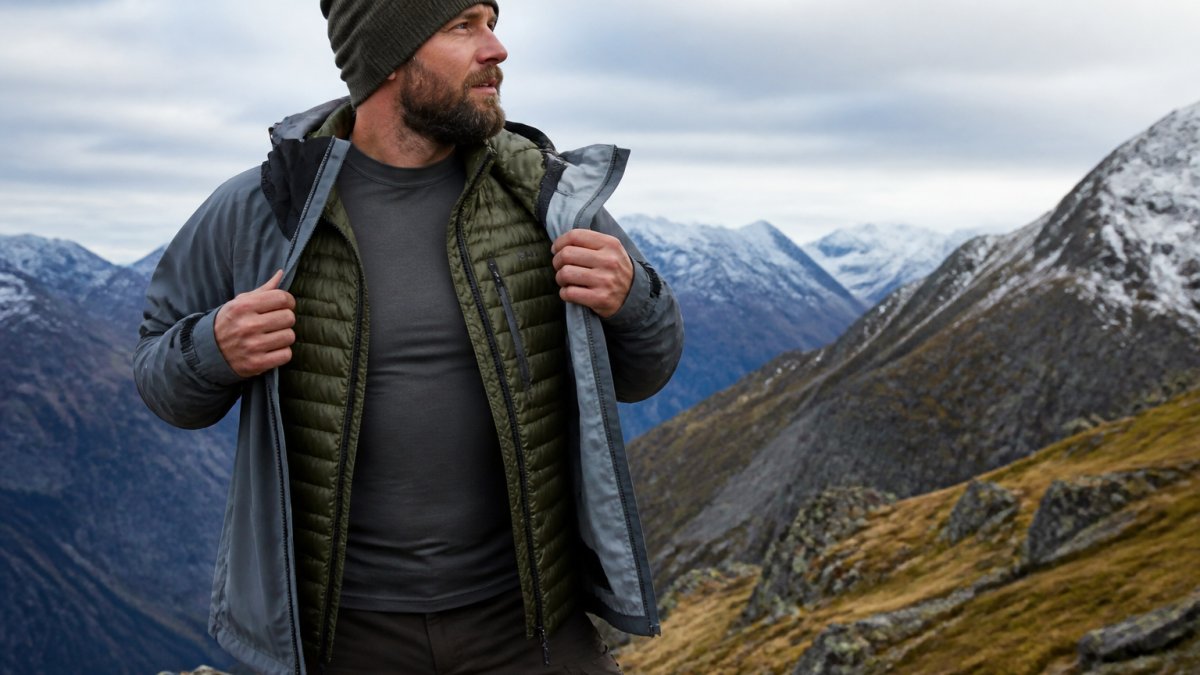
Layering is the foundation of outdoor apparel performance. Three-layer systems work because each layer handles one job. Remove or add layers as conditions change. This approach beats wearing one thick jacket because it gives you control.
Base Layer: Moisture-Wicking Foundation
Your base layer sits against your skin and pulls sweat away from your body. Cotton fails here, it absorbs moisture and stays wet.
Moisture-wicking clothing for outdoor activities keeps you dry during exertion.
Look for synthetic blends or merino wool, both dry quickly. Merino resists odor and regulates temperature naturally; synthetics cost less and handle abuse better.
Mid Layer: Insulation and Temperature Regulation
The mid layer traps warm air around your body. Fleece, down, or synthetic insulation all work.
Down insulation is light and compressible but fails when wet. Synthetic retains warmth even when damp; fleece dries faster than down but weighs more.
For wet environments, synthetic mid layers outperform down; for dry cold, down's weight advantage wins.
Outer Layer: Weather Protection and Wind Resistance
Your outer shell blocks wind and rain and must shed water without trapping moisture inside.
Wind protection matters more than most realize, wind strips away your body's insulating layer of warm air.
Breathability prevents overheating; a fully waterproof shell without it traps sweat inside. Modern outdoor apparel uses membranes that balance protection and breathability.
Moisture-Wicking Clothing for Outdoor Activities
Sweat management defines whether outdoor apparel keeps you comfortable or leaves you cold and exhausted.
Cotton absorbs moisture like a sponge, holding water against your skin and drying slowly.
Test your base layer during activity: you should feel dry to the touch even after sweating.
Quick-drying performance matters for extended missions.
Weather-Appropriate Outdoor Apparel Selection
Different environments demand different gear: cold weather requires insulation and wind protection, hot weather requires breathability and sun protection, and wet conditions require waterproofing and quick drying. Matching apparel to actual conditions prevents discomfort and danger.
Cold Weather Gear: Insulation and Heat Retention
Cold weather gear prioritizes insulation and thermal regulation. Your body loses heat through radiation, conduction, and convection; insulation slows all three.
Down insulation offers an exceptional warmth-to-weight ratio, but it's vulnerable to moisture, in truly wet cold, synthetic performs better.
Extremities matter. Cold weather gear includes insulated gloves or mittens, a warm hat, and neck protection.
Hot Weather Gear: Breathability and Sun Protection
Hot weather gear emphasizes breathability and sun protection. Your body cools through sweating and evaporation.
Lightweight, light-colored clothing reflects sunlight and allows airflow; a loose fit lets air circulate, and breathable fabrics prevent sweat from pooling on your skin.
UV protection matters even on cloudy days. Ultraviolet rays penetrate clouds and cause sunburn and skin damage.
Moisture-wicking becomes even more critical in heat.
Wet Weather Gear: Waterproof Membranes and Water Resistance
Wet weather gear must shed water while allowing sweat vapor to escape.
A waterproof jacket with sealed seams and taped zippers keeps rain out; unsealed seams leak during heavy rain.
Drying time matters in wet conditions.
Wet weather protection extends beyond jackets. Waterproof pants, boots, and gloves complete the system.
Outdoor Clothing Checklist for Mission-Ready Gear
A packing list is not a mission plan. Duration, terrain, workload, and expected weather each change what belongs in your bag. Build the list around those four variables, then verify it against measurable performance criteria before you step off.
Step 1: Define the Mission Variables
Write these four answers down before you pack anything:
- Duration: A 4-hour patrol and a 72-hour movement carry different redundancy needs. Past roughly 24 hours, plan on one dry base layer per day plus one spare.
- Terrain: Rock and scree chew through lightweight fabrics. Brush and thorn expose seams and cuffs. Wet ground demands waterproof footwear with aggressive tread.
- Workload: Heavy rucking generates far more sweat than static observation. High-output missions push you toward lighter insulation and faster-drying fabrics; low-output missions toward more static insulation.
Step 2: Build the Clothing System
| Layer | Mission Role | What to Verify |
|---|---|---|
| Base layer | Moves sweat off skin | Fits snug without binding; synthetic or merino; dries in 2-3 hours under airflow |
| Mid layer | Traps warm air | Loft intact; synthetic if precipitation is likely, down if conditions stay dry |
| Soft shell | Blocks wind, sheds light rain | Stretch panels at shoulders and elbows; breathable enough for output |
| Hard shell | Blocks rain and wind | Taped seams, storm flap over main zipper, hood that fits over a helmet or hat |
| Insulation layer | Static warmth at rest | Rated for the low end of the expected temperature range |
| Head and neck | Reduces heat loss | Hat covers ears; neck gaiter doubles as a face cover in wind |
| Hands | Dexterity plus warmth | Gloves allow trigger, knot, and zipper manipulation; liner gloves as backup |
| Feet | Traction, dryness, blister control | Boots broken in; two spare sock pairs; sock liners if blisters are a known issue |
| Eyes and skin | UV and debris protection | UPF 30-50+ coverage; sunglasses with side coverage |
| Visibility | Identification in low light | Reflective or high-visibility element on the outermost layer |
Step 3: Apply Performance Criteria, Not Marketing Claims
Vague "high quality" language does not survive contact with weather. Use criteria you can actually test:
“Trooper” MultiCam/OCP 3-Side Zippered Poncho Liner with Headport & Stuff Pad →
- Drying time: A base layer that dries in 2-3 hours under moderate airflow is usable; anything damp past that window becomes a hypothermia risk when temperatures drop.
- Breathability: If you finish a climb with a soaked inner shell, the membrane is not moving vapor fast enough for your output level.
- Water resistance: Water should bead and roll off a treated shell. When it starts wetting out and darkening, the durable water-repellent finish needs renewal.
Step 4: Pre-Departure Verification
Run this check the night before and again at the trailhead:
- Lay every layer out in the order you will wear it. Missing pieces show up fast this way.
- Confirm the hard shell still beads water. If it wets out, reapply a DWR treatment or swap shells.
- Test every zipper, drawcord, and hook-and-loop closure. A stuck zipper on a rain shell is a mission-ending failure in cold rain.
- Pack one dry base layer and one dry sock pair in a waterproof bag. These are your emergency dry set, not your daily wear.
- Confirm your outermost layer carries a visibility element for low-light movement.
Fit, Mobility, and Durability: Testing Your Gear Before the Mission
Wear your outdoor apparel and perform the movements you'll need. Crouch, reach overhead, bend forward.
Mobility testing matters for tactical or emergency situations.
Durability determines how long gear lasts: quality outdoor apparel survives multiple seasons, while poor construction fails within months.
Inspect zippers for smooth operation, stuck or broken zippers render jackets useless.
Fabric weight affects durability. Find the balance for your mission. Dragoon Unlimited's poncho liners use durable polyester construction designed to shed wind, moisture, and dirt while lasting through years of field use.

Common Gear Failures and How to Prevent Them
Gear fails in predictable ways, and most failures trace back to skipped maintenance or use beyond design limits. Treat every failure below as a safety issue: a failed zipper, a wet-out DWR finish, or a blown seam in cold wind can turn a manageable mission into an emergency.
Zipper Failure
Cause: Dirt, sand, and dried mud accumulate in the track; teeth misalign under load; sliders wear out.
Field fix: Brush the track clean with a soft brush or toothbrush. Work the slider back and forth without forcing it.
Prevention: Rinse zippers after dusty or sandy use. Store gear with zippers partially open to reduce stress on the slider and prevent moisture trapping.
Seam Separation
Cause: Thread abrasion, UV degradation, or stress beyond the seam's design load, common at shoulder straps, pack contact points, and crotch seams.
Field fix: Apply seam tape or a repair patch over the failing area.
Prevention: Inspect high-stress seams before every mission. Reinforce known wear points with fabric tape before they fail.
Water Penetration Through Seams
Cause: Taped seams peel, crack, or were never fully sealed; zippers lack storm flaps.
Field fix: Reapply seam sealer to the affected area and let it cure. In cold conditions, allow extra cure time.
Prevention: Check taped seams at least once a season. Reapply seam sealer when tape lifts or cracks.
DWR Wet-Out
Cause: The durable water-repellent finish on a shell wears off with use, dirt, and repeated washing.
Field fix: There is no true field fix.
Prevention: Wash the shell per the manufacturer's instructions, dirt and body oils mask the DWR. Then reactivate the finish with heat per the care label, or apply a spray-on or wash-in DWR treatment.
Insulation Compression
Cause: Repeated stuffing into packs, long-term storage in compression sacks, and moisture exposure.
Field fix: Shake the garment out and let it loft. Down recovers with agitation; heavily matted synthetic insulation recovers less.
Prevention: Store insulated gear loosely or hang it between missions. Only compress it for transport, not for storage.
Fabric Degradation
Cause: UV exposure weakens fibers over time; heat and sunlight in vehicles accelerate it.
Field fix: None. Retire the garment from mission use once fabric tears easily or feels brittle.
Prevention: Store gear out of direct sunlight. Avoid leaving apparel in hot vehicles.
Metal Zipper Corrosion
Cause: Saltwater and prolonged moisture exposure.
Field fix: Rinse with fresh water as soon as practical and dry completely.
Prevention: Rinse after any saltwater contact. Dry fully before storing.
Between-Mission Maintenance Routine
- Empty every pocket and check for debris in zippers and hook-and-loop closures.
- Wash per the care label, mild detergent, no fabric softener, no bleach.
- Dry completely before storage; damp storage breeds mildew and degrades insulation.
- Reapply DWR when water stops beading.
- Inspect seams, zippers, and stress points; repair or retire anything questionable.
- Store in a cool, dry place away from direct sunlight.
Frequently Asked Questions
What features make outdoor apparel safer and more comfortable during missions?
The right outdoor apparel combines moisture-wicking fabrics to manage sweat, breathable materials for temperature regulation, and weather-resistant outer shells for protection. Layering systems allow you to adjust to changing conditions without carrying excess bulk. Look for apparel with freedom of movement, reflective materials for visibility, and durable construction that withstands rough terrain and sharp branches. Quality outdoor gear prevents hypothermia, heat exhaustion, and minor injuries while keeping you dry and mobile.
How should you choose outdoor clothing for changing weather?
Start by assessing the temperature range, precipitation risk, and wind conditions for your mission. Select a base layer that wicks moisture away from skin, add a mid layer for insulation (synthetic or wool), and top it with a weather-resistant outer shell. Bring extra layers you can add or remove as conditions shift. Multi-functional pieces like the Trooper MultiCam Poncho Liner work as both insulation and weather protection, reducing pack weight. Always carry more layers than you think you'll need, conditions change faster than you expect.
What layers should you wear for an outdoor mission?
A complete system includes a moisture-wicking base layer (synthetic or merino wool), an insulating mid layer (fleece or synthetic), and a waterproof or water-resistant outer shell. Add a hat, gloves, and appropriate footwear for the environment. For sleeping or emergency shelter, a lightweight survival blanket like the Dragoon Unlimited poncho liners ($69.99) provides critical warmth without bulk. In hot conditions, skip heavy insulation and focus on breathable, lightweight fabrics with UV protection and quick-drying capability.
Why is proper storage important for outdoor apparel between trips?
Storing apparel correctly extends its lifespan and maintains performance. Keep gear in a cool, dry place away from direct sunlight, which degrades fabric and elastic. Wash and fully dry items before storage to prevent mold and mildew. Store insulated layers flat or loosely folded to prevent compression damage that reduces warmth. Poncho liners and survival blankets should be kept in their stuff sacks in a dry location. Proper storage ensures your gear performs reliably when you need it most.


